
🔖 For: Creator Plan & Digital Academy Plan.
For solo entrepreneurs, a website acts as a 24/7 automated money-making machine. But for that machine to run on time, send the right emails, and avoid system clutter, you must "wind it up" accurately.
By spending just 5 minutes in the Settings drawer on the left sidebar, you can finalize this entire foundation.
Step 1: Set up your brand identity
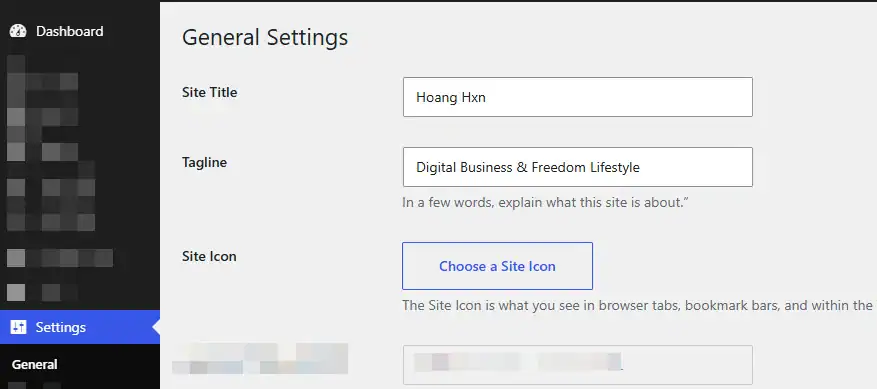
When you send your website link to partners or when customers search for your name on Google, this is the first "signboard" they see. Go to Settings → General to start:
Site title
Enter your exact personal brand or business name (e.g., Hoang Hxn or Cuong Thach).
Tagline
Enter your core positioning message.
⚠️ Warning: If you see the default text "Just another WordPress site", delete it immediately to avoid hurting your SEO! Enter a clear message instead (e.g., Lean digital business system).
1. Who are you?
2. What is the biggest problem you solve?
3. What is your core product?
4. Why choose you?
5. What do you want them to do next?
Then, Copy your answers and send this prompt to Gemini
You are a brand positioning and practical SEO expert. I am a solo entrepreneur in Vietnam. Here are my answers to the 5 core questions:
[Paste your answers].
Based on this, generate 5 short, concise taglines (under 10 words) that appeal to Vietnamese clients and are SEO-friendly for Website.
Site icon
A site icon (favicon) is the tiny image that appears on browser tabs, helping visitors identify your tab easily and making your site look much more professional. For personal brands, use a square crop of your face; for business brands, use your logo icon.
How to set it up:
Go to Settings --> General --> Site Icon --> Select site icon.
Upload a square image of at least 512x512 pixels.
Step 2: Sync system language and time
This is a vital step to ensure your automated machine runs smoothly. Right on the General settings page, scroll down:
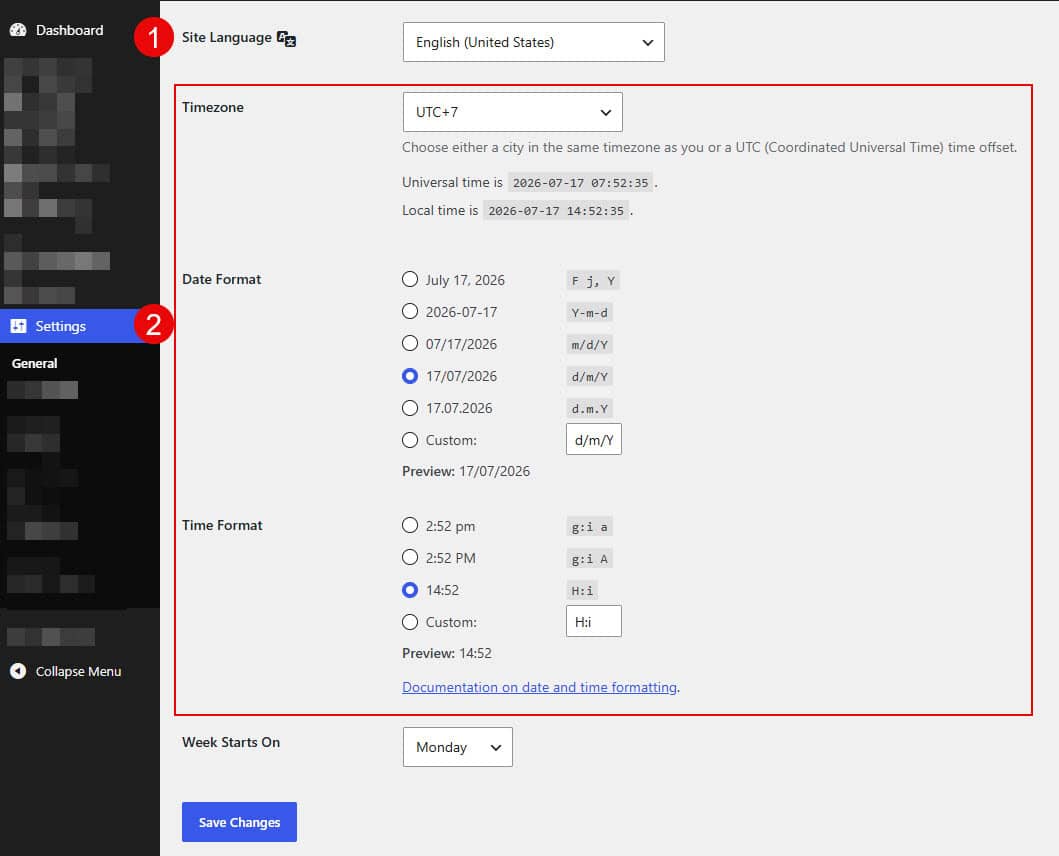
Site language
Under Site Language, select your primary language (e.g., Tiếng Việt or English). This ensures all automated invoices or course notifications sent to your customers are in the correct language.
Timezone
Under Timezone, click the dropdown list, scroll to the top, and select your local timezone (e.g., UTC+7 for Vietnam).
Date and time format
Date Format: Select the Custom radio button, enter d/m/Y to display the date in a standard format (e.g., 17/07/2026).
Time Format: Select the Custom radio button, enter H:i to display the 24-hour clock (e.g., 14:30).
Step 3: Activate spam protection
This helps protect your database from bots creating thousands of fake accounts every night.
Disable open registration
Scroll down to the Membership section and find the text "Anyone can register".
Once your system is complete, Blueky One will automatically grant access and create secure accounts only for students who actually pay (a Membership feature exclusive to the Digital Academy Plan). Finally, click Save Changes.
Step 4: Clean up SEO permalinks
By default, the system often generates messy URLs containing dates (e.g., https://your-domain.com/2026/07/15/course). To make your sales links look professional and rank higher on Google, you need to simplify them.
Go to Settings → Permalinks on the left sidebar.
Under the Permalink structure section, select Post name.
Scroll to the bottom and click Save Changes.
From now on, your course links or blog posts will be perfectly clean (e.g., https://your-domain.com/mindset-course). This helps customers easily remember and completely trust your links when clicking to buy.
🎯 Next steps: The foundation is set, and the machine is ready. Start building your interface by learning Getting to know the Block Editor or How to create and design a new page.